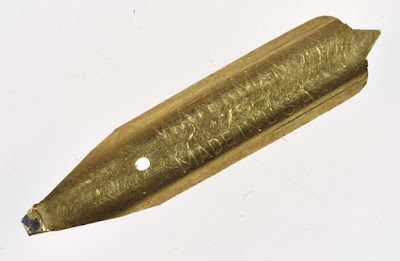
The form of the nib is such that my colleague Andrew Midkiff has suggested that it might be a specialized ruling pen. Certainly the rolled metal sheet construction would have been much more demanding than that of a more conventional quill-pen shaped metal nib -- but unfortunately examples of medieval metal nibs are so rare that definitive conclusions cannot be deduced from available evidence.
A blog about antique and vintage writing instruments: fountain pens, mechanical (propelling) pencils, dip pens, and more.
Friday, December 10, 2021
A bronze-nibbed dip pen from 11th-century Ireland
The form of the nib is such that my colleague Andrew Midkiff has suggested that it might be a specialized ruling pen. Certainly the rolled metal sheet construction would have been much more demanding than that of a more conventional quill-pen shaped metal nib -- but unfortunately examples of medieval metal nibs are so rare that definitive conclusions cannot be deduced from available evidence.
Monday, December 6, 2021
An appreciation of stubby pens
Big pens may be the most highly valued, but there's much to be said for their slightly smaller stubby siblings. The full-length Senior may be the flagship of the Duofold line (whether in classic orange-red, or Mandarin Yellow as above), yet will it even fit in the average shirt pocket? For pocketability, give me a Duofold Junior: the perfect length, with a comfortable girth. No wonder that Pelikan adopted very similar proportions for their pens, from their original piston-filler through the 100, 100N, and 400 series and beyond. Waterman also offered shorter versions of their full-sized pens, with the most common being the 52V -- a stubby version of their standard 52 lever-filler. Bigger "V" models (the "V" standing for Vest Pocket) are harder to find, and correspondingly sought after.
Some time ago it struck me that while Duofold Juniors are pretty common, it's not easy to find examples in clean condition. These pens hit a popular price point, and were carried and used for years, indeed decades: real working pens, an exemplar of successful design.
Saturday, December 4, 2021
An unfinished Waterman nib
Unfinished nibs don't turn up that often. This one is a 1940s Waterman nib for a Taperite, which has been shaped, imprinted, and tipped, but hasn't had its slit cut or tip ground.
At first glance, it might seem that there is no tipping yet attached. The tip is visibly thicker, yet it seems to be all of the same 14K gold alloy as the rest of the nib, whether viewed from above or below. This, however, neatly illustrates how older gold nibs were often tipped -- and especially those with wider oblong tips.
Rather that welding a pellet onto the very tip of the gold nib blank, the tipping material was attached to the underside of the tip, enclosing the tipping material with molten gold. The tip was then ground, revealing and shaping the tipping material under the gold. Where the tipping would not have to be exposed to contact the writing surface, the gold was left intact, wrapping around the tipping for maximum support (a description of the process from 1912 can be found here). This is why the tipping on many older nibs is barely visible from the top of the nib -- which has sometimes led to the mistaken impression among those accustomed to modern fountain pens that the vintage tipping is worn down and not fully intact.
While the most dramatic examples of this are to found in early 20th-century stub and italic nibs from makers such as Waterman and Mabie Todd, the Sheaffer display from c. 1940 shown above also nicely illustrates another variation of the same basic procedure.
PS This is a good opportunity to point out that this method of nib manufacture can make it very challenging for a restorer to retip an older nib so that it looks 100% original -- or even to retip it at all. It's not widely appreciated that retipping that preserves an old nib's appearance requires the addition of gold to the tip before new tipping is attached (old retips were done without adding gold, leaving the retipped nib's proportions awkwardly shortened). It's also not widely appreciated that many highly flexible vintage nibs were thinned after tipping, sometimes leaving the gold of the tines so thin as to make attachment of new tipping almost impossible without burning holes in the gold.
Sunday, November 7, 2021
Grading vintage pens: why isn't there a standardized system?
"I'm rather dubious about the whole idea. The problem is that pens cannot be graded along a single scale. Unlike coins, which through normal circulation wear in a consistent manner, pens do not age consistently. One example might have extensive brassing but fine color, which another might have excellent trim but mediocre color. A single grade is insufficient description."
"What doesn't get mentioned when coins and cards are brought up is that the items graded then have to be slabbed. Otherwise there's no way of knowing if the assigned grade goes with the proffered specimen. No one is going to want pens (or pencils) that are permanently locked into a lucite block and cannot be handled."
"In any case, it is folly to think that any grading system could get any acceptance at all if introduced by someone with no knowledge of the field and completely unknown to it."
"I used to collect coins extensively, and at the time there were three different major grading companies that all might give different results. It was common for people who didn't like the grade they got to break them out of the slab and either resubmit them or send them to a different company to grade shop. I think we're just fine with what we have with pens."
"The bigger issue, frankly, is widespread overgrading. I'd love to see something done about that, both as a collector and as a conscientious seller. It's maddening to see the virtually unanimous praise in online groups and forums for sellers who are notorious for representing overpolished and obviously reblackened pens as pristine, but that seems to be the social dynamic -- where almost no one is willing to say anything bad about another group member, and where those who do speak out are excoriated and dismissed as bitter haters."
"The polishing and reblacking thing drives me absolutely insane. And that's even ignoring the claims some people make about their reblacking solution and polishes"
"Yes, anyone who tries to say "hold on, wait a minute" is trampled, and anyone without any backchannel access gets a completely distorted picture of what is what."
"This might be well-intentioned, but it's dead before it leaves the starting gate. Only a multidimensional characterization can provide the information needed to consider the condition (and, in turn, to feed into a calculation about the value) of a vintage fountain pen."
"I know there is a longing for a single grade, because it's so neat and lends itself to direct comparisons, sorting, etc. But it's misguided and wrongheaded. No collector of even modest education in the field would ever be satisfied with a single letter or number when desiring to know the condition of a pen. Never, ever."
"Having been involved in the discussion for 20+ years I think the best we can do is as complete a description as possible. There are so many variables that would go into grading you could call a pen average and a description could support that. Another pen could be exceptional but, the description would support that. Without the detailed description the grade would be useless. So a grading system is meaningless leaving one with as complete a description as possible."
"I think another factor with pens specifically is that the grade can and does change over time. Particularly with delicate plastics, the condition can change drastically over a couple of years. That doesn't happen in the same way with coins, for example"
Saturday, November 6, 2021
Japanese Jumbo repair notes
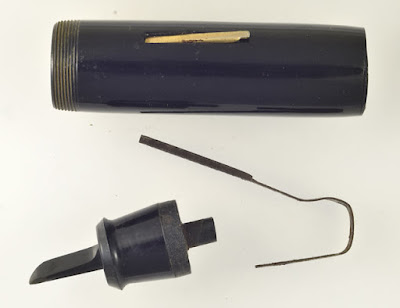
Most Japanese Jumbo pens are dropper-fillers ("eyedroppers"). Don't be fooled by the center shaft attached to the end knob; that is an ink shutoff valve design that is characteristically Japanese, without any piston seal at the end of the shaft to allow the assembly to work as a filling system. In most cases the original cork packing seal is no longer sound, and if the pen is filled it will leak around the shaft. To replace the seal, you will have to start by unscrewing the knob from the shaft. This is typically the most difficult step of the repair procedure.
Heating the knob from the outside with a heat gun may be necessary. Once the area of the joint is only slightly pliable, gently twisting the knob very slightly back and forth can break the bond of the threads just enough to allow the alcohol to enter. You do not want to twist too far or too hard with the hard rubber heat-softened, as the shaft is easily broken in that state.
Once you have successfully unscrewed the shaft, you will want to clean out the barrel interior thoroughly. Then plug the shaft hole, stand the barrel upright, and fill it with a bit of water. What you are doing is soaking the threaded joint providing access to the packing unit.
Empty and dry the barrel, removing the plug. Take a triangular scraper and push it firmly into the shaft hole and turn it counterclockwise, unscrewing the threaded closure washer. Using the right amount of pressure may take some practice -- you want to use just enough to keep the scraper from slipping (more on the use of scrapers for this purpose here).
Since the basic design of the ink-shutoff dropper-filler as adopted in Japan was taken from the Onoto plunger-filler, it's not a surprise that the dimensions of both shaft and packing compartment follow the Onoto standard as well. Premade Onoto cork seals can be used in Jumbo packing units, or you can cut your own, or use O-rings. Clean out the packing compartment, put in a new seal, and reverse the above directions to reassemble.
Paradoxically, the less common lever-filling Jumbos are not as straightforward to get working as the ink-shutoff dropper-fillers. I'm afraid I don't have a photo, but these pens originally came with a truly outlandishly shaped rubber sac big enough to fill up the cavernous barrel and also necked down enough to fit the tiny section nipple.
The pressure bar is one-piece -- a true J-bar by the term's original definition. The thing is, the lever's throw isn't enough to push the pressure bar all the way down to the far side of the barrel interior. It's not even close, even with the thick walls of the original sac. When new, these pens would not have been able to empty their sacs fully. And resultingly, would not have been able to fill their sacs fully, either. Not optimal, in that fountain pens are inherently prone to irregular ink flow when they have more air than ink in their reservoirs.
The Onoto tool and other spanners for threaded washers
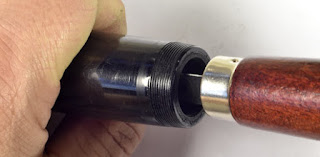
The Onoto tool is a clever device that is not widely known in the pen repair community, especially outside of the UK. Its main purpose is to allow servicing of an Onoto plunger-filler's packing unit with the shaft still in place, allowing one to avoid having to remove the filler knob.
The two prongs are pressed firmly into the face of the hard rubber closure washer at the back of the packing compartment, allowing the washer to be unscrewed and the packing replaced (the procedure entails slitting the replacement cork seals, wrapping them around the shaft, and pushing them into place, stacking them so that the slits of the seals do not line up).
Sunday, October 17, 2021
The original Mabie Todd bulb-filler
Mabie Todd was an early entrant into the fountain pen market, but a little slower off the mark when it came to self-filling pens. Their first self-fillers are scarce, and little has been written about them to date. Made only in the USA, they were bulb-fillers -- but with a difference.
Sunday, August 22, 2021
Yes, Aerometric Parker 51s can have hidden problems, too
It's often said that the Aerometric (squeeze-filling) Parker 51s of the late '40s to early '60s are virtually bulletproof: that even as-found examples usually need no more than to be cleaned out by repeated filling and emptying with water, and that their Pli-Glass sacs are nearly indestructible. There is some underlying truth to all this, but at the same time it obscures the fact that Aerometric 51s do have their vulnerabilities -- and that there are good reasons to have one properly serviced for best results. In fact, the ease with which most long-neglected Aerometric 51s can be put back into working order can be a bit of a trap, for many who offer Aerometric 51s as reconditioned (or who offer reconditioning services) don't bother taking the extra steps to make certain that they are truly 100% restored.
 |
Proper reconditioning will entail complete disassembly. Removal of the hood (shell) is essential, inasmuch as the collector (at the left above) is prone to clogging -- and when dried ink residue packs the finely-ribbed ink trap, it often cannot be removed by soaking and ultrasonic cleaning alone. A 51 with gunk in the collector may work, but it will be more vulnerable to flooding and ink flow may not be consistent.
Monday, June 7, 2021
Don't soak that pen!
But in fact there are many reasons not to soak, ranging from ineffectiveness to the all too real possibility of irreversible damage. Pens may be made to hold liquid, but it doesn't necessarily follow that they were made to be submerged in it. Pen repair professionals resort to soaking very selectively. In those cases where soaking is done, the pen's materials and construction are positively identified and thoroughly understood beforehand, and the water exposure is held to a minimum in terms of both area and duration.
What can go wrong with soaking? Many pen materials can be harmed by even relatively short exposure to water. Most notable are casein-based plastics, which will swell, distort, and split (they will not, however, actually dissolve). Hard rubber (ebonite) will instantly fade if its surface has had any significant exposure to light over the years. Despite what many say, this fading doesn't require a prolonged soak: even spattered waterdrops will often do it. Celluloid is more water-resistant, but is still much more permeable than newer and harder plastics. Light-colored celluloids can stain if left soaking in inky water, and celluloids with metallic veining or marbling can have their gold or bronze-colored parts turn dull and chalky with water absorption.
When pen people talk about soaking, what is meant isn't always clear. The most problematic sort of soaking is the indiscriminate dumping of the entire pen into water. Caps are prone to accumulate dried ink inside, but it's best to clean them out with moistened cotton swabs and brushes of the sort used for cleaning test tubes. One should not even consider soaking caps with nondetachable metal parts – above all clips, but also trim rings. Introducing moisture is a lot easier than getting it all out again. And once it's there, it will promote corrosion (including on plated and gold filled components, which always have some exposed base metal). For related reasons, it's also a bad idea to immerse a cap with a separate inner cap. Once water gets into the space between the inner cap and outer cap, the tightness of the fit plus capillarity will ensure that it will be there for a very long time. This is of particular concern when the outer cap is made of celluloid, and especially when the celluloid is light-colored or translucent. Staining is one possible consequence, but so is increased visibility of the inner cap. And with certain celluloid caps, notably Wahl-Eversharps, the presence of soft rubber washers makes the introduction of moisture especially hazardous, unleashing the same sort of discoloration more commonly caused by deteriorating ink sacs.
Routine soaking of barrels is also a bad idea. Removing a hardened sac is best done dry, using hooked extracting tools and cylindrical or tubular scrapers. And water inside a barrel can do serious harm to any metal parts inside – harm that may take some time to become apparent. Springs and pressure bars can corrode, while the C-shaped retaining springs typically used to hold levers in place are notoriously prone to rust. Even when the interior of a lever-filler barrel is quite dirty, there's little to be gained by scrubbing it clean, and much at risk. Pens with barrels which directly hold ink, whether eyedropper-fillers or pump-fillers, do need to have their interiors scrubbed out, but this doesn't require soaking, or at least the soaking of anything but the interior.
Some may object that they don't soak the whole pen, only the section joint, standing the pen nib-down so that the water line only just covers the line where section and barrel meet. This minimal approach is certainly far better than full immersion, but still deserves critical examination. To start with, what is soaking of the joint supposed to accomplish?
If the pen is a dropper-filler, the joint will be threaded, and if it is stuck, the likely cause will be dried ink in the threads. Targeted soaking of the section joint will soften the dried ink, allowing the section to be unscrewed. This is one of the few cases where soaking is entirely appropriate, though it must be noted that it is likely that the hard rubber will end up faded where soaked, and will have to be polished to restore its color. To avoid the need for polishing (when the section bears imprints, for example), there are alternatives, such as introducing water into the interior of the barrel with an eyedropper and allowing it to soak into the joint from the inside, putting a drop of naphtha into the joint from the outside, and the application of heat.
If the pen is not a dropper-filler, more than likely it is something other than ink that is preventing removal of the section. If the section screws into the barrel, that something is probably shellac or a rosin-based sealant-adhesive. Water won't have much effect in such cases, but dry heat will (as will certain solvents). If the section is a press-fit into the barrel, the same may apply, though often it is mostly friction holding the section in place.
Sometimes soaking will allow a tight press-fit section to be extracted, the water in the joint acting as a lubricant. What has to be considered, though, is that lubrication of a very tight joint can also have the effect of making it just that much easier to crack the barrel at its threads. Hard rubber doesn't shrink over time, while plastics such as celluloid and cellulose acetate do, so the effects of age often leave the barrel mouth strained right up to its limits. Applying heat allows that stress to be relieved while greatly reducing the material's brittleness. The extreme case of this is red hard rubber, whose brittleness can be so extreme, one should never attempt section removal (or replacement) cold.
Sunday, April 11, 2021
Why toothpaste is a bad choice for pen polishing
Popular recommendations can lead you astray. One example is the use of toothpaste to polish pens, and especially nibs and metal trim. Experts on antique silver warn against using toothpaste, but the websites I've seen don't explain why. So here's the scoop.
The abrasives used for toothpaste aren't carefully graded for particle size, unlike abrasives specifically intended for polishing precious metals and plastics. In large part that's because they are specifically chosen to be hard enough to scour off gunk sticking to your teeth, without being so hard as to scour off the hard outer layer of your teeth themselves. On a gold nib or gold plated trim, though, it's a different story. The toothpaste abrasive is much harder than those surfaces, and because the grit size is uneven, will remove an excessive amount of material while still leaving the surface covered with fine scratches.
Overall, you are best off using a jeweler's cloth -- the Sunshine brand being one of the most popular and widely distributed.


